AmebaDocs
latest

开源 SDK 平台

  • Arduino SDK
  • MicroPython SDK
    • 快速入门手册
    • Release History
    • 范例演示
      • 外围硬件相关范例
        • [RTL8722CSM] [RTL8722DM] ADC - 读取电位器数值
        • [RTL8722CSM] [RTL8722DM] GPIO - 闪烁LED
        • [RTL8722CSM] [RTL8722DM] I2C - 发送与接收
        • [RTL8722CSM] [RTL8722DM] PWM - LED 渐变
        • [RTL8722CSM] [RTL8722DM] RTC -时间显示
        • [RTL8722CSM] [RTL8722DM] Socket - Echo服务器与客户端
        • [RTL8722CSM] [RTL8722DM] Socket - 从HTTP网站获取信息
        • [RTL8722CSM] [RTL8722DM] SPI - 作为从设备接收消息
        • [RTL8722CSM] [RTL8722DM] Time - 延迟和计时
        • [RTL8722CSM] [RTL8722DM] Timer -周期性定时器
        • [RTL8722CSM] [RTL8722DM] UART - 发送和接收
        • [RTL8722DM_MINI] SDFS 数据编辑
        • [RTL8722DM_MINI] SDFS - 目录操作
      • 网络相关范例
    • 开发板 HDK
    • API 文档
    • 相关资源
    • 支援
  • 瑞昱标准 SDK

资料下载

  • 资料下载
AmebaDocs
  • »
  • MicroPython SDK »
  • 范例演示 »
  • [RTL8722CSM] [RTL8722DM] GPIO - 闪烁LED
  • 在 GitHub 上修改

[RTL8722CSM] [RTL8722DM] GPIO - 闪烁LED

材料准备

  • Ameba x 1

  • LED x 1

  • 电阻(阻值200奥姆)x 1

范例说明

闪烁LED是开始了解并使用MicroPython最好示例。

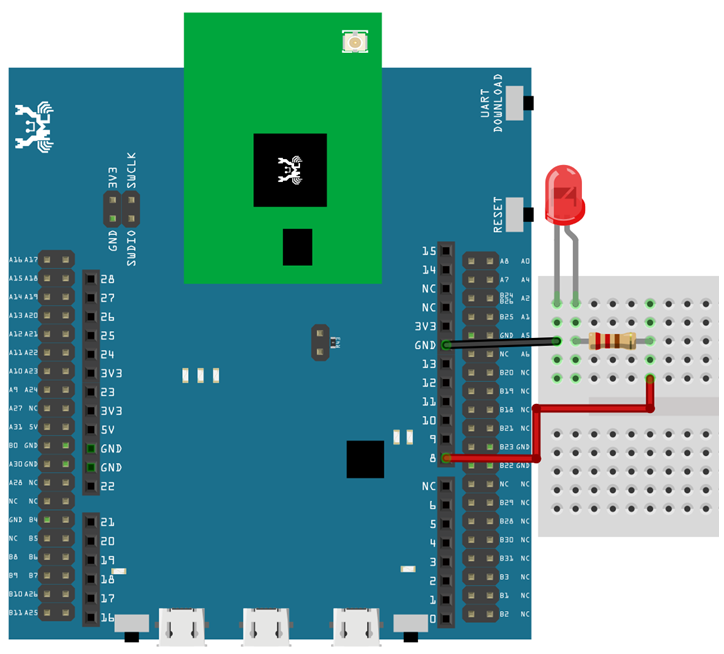
首先,如下图所示将PB_22引脚连接到与限流电阻串联的LED的阳极引脚,再将GND连接到LED的阴极引脚:

image1

Then, copy the following code and press Ctrl + e in REPL to enter the paste mode (for more information about REPL and paste mode, check “Getting Started” page). If you are using Tera Term, simply right click on any blank space of the terminal and paste the code into REPL, then press Ctrl + d to execute the code. If everything is order, you should be able to see the LED blink for 3 times in 3 seconds.

from machine import Pin
a = Pin("PB_22", Pin.OUT)
a.value(1)
time.sleep_ms(500)
a.value(0)
time.sleep_ms(500)
a.on()
time.sleep_ms(500)
a.off()
time.sleep_ms(500)
a.toggle()
time.sleep_ms(500)
a.toggle()
上一页 下一页

© 版权所有 2021, Ameba IoT. 修订 474f81ce.

利用 Sphinx 构建,使用了 主题 由 Read the Docs开发.